How to Use a Moka Pot: A Small-Space Home Café Guide

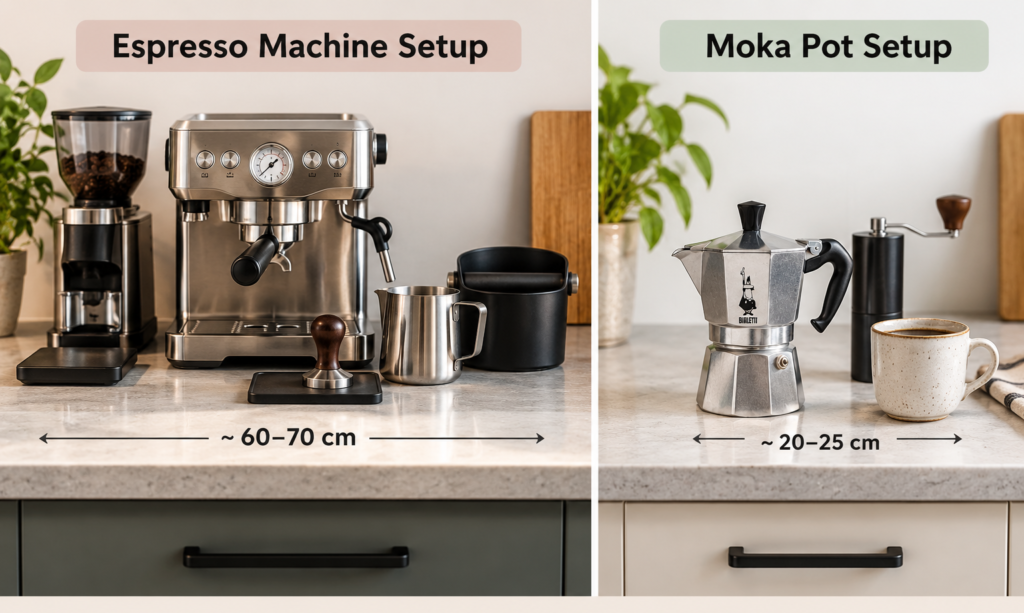
Having a home café doesn’t require giving up half your kitchen counter. While standard home espresso machines offer high-pressure extraction, they often demand dedicated counter real estate for the machine itself, plus a grinder, portafilter stands, and knockboxes.
If you live in an apartment or have a small kitchen, learning how to use a moka pot—often called a stovetop espresso maker or traditional Italian coffee maker—offers a compelling alternative. Standing roughly 7 inches tall and costing between US$20 and US$50, a 3-cup Moka pot brews a rich, concentrated coffee that sits comfortably between drip coffee and espresso, serving as an ideal base for lattes, cappuccinos, and iced drinks. Best of all, when you finish brewing, it tucks neatly into a standard kitchen drawer.
This guide breaks down how to choose the right size, master the brewing technique, and maintain your coffee maker for a compact home café setup.
Moka Pot vs. Espresso Machine & Cafetiere: Zero-Counter-Space Coffee
When planning a small-space coffee setup, comparing a moka pot vs espresso machine (or evaluating a moka pot vs cafetiere / French press) helps clarify what fits your kitchen and lifestyle:
- Counter Footprint & Storage: Compact espresso machines have gotten smaller, but they still require a permanent footprint near an electrical outlet. A Moka pot uses zero permanent counter space—you pull it out to brew on the stove and store it away when finished.
- Cost of Entry: A classic Moka pot costs US$20–US$50, compared to US$140 to over US$1,000 for a quality home espresso machine.
- Moka Pot vs. Cafetiere: While a cafetiere (French press) produces a lighter, immersion-brewed cup, a Moka pot uses steam pressure to yield a much stronger, heavy-bodied base ideal for milk drinks.
- Workflow & Clean-Up: Espresso machines require wiping steam wands, purging group heads, and knocking out wet pucks into a dedicated container. Cleaning a stovetop brewer simply involves rinsing three components under warm water once cooled.
- The Result in the Cup: An espresso machine uses a mechanical pump to force hot water through finely ground coffee at roughly 9 bars of pressure, creating a dense shot with natural crema. A Moka pot uses steam pressure (about 1.5 to 2 bars) to yield a strong, concentrated coffee. While not technically 9-bar espresso, Moka coffee is punchy enough to cut through milk effortlessly.
If you want true 9-bar espresso and have space to spare, exploring our cornerstone guide to the best home espresso machines is a great starting point. But if you want rich, milk-ready coffee without sacrificing counter space, a Moka pot is one of the most space-efficient solutions available.
What Size Moka Pot Should You Buy?
One of the most common points of confusion for beginners is Moka pot sizing. Manufacturers measure Moka pots in “cups,” but a Moka “cup” refers to a traditional espresso-style measure (typically around 40–50 ml or ~1.5 fluid ounces per cup depending on the model), not an 8-ounce mug.
Choosing the right size is essential for a small kitchen because Moka pots are designed to brew with the filter basket filled. A large Moka pot isn’t ideal if you regularly want to make only half its normal capacity.
| Size | Typical / Approximate Brewed Yield | Best Suited For |
|---|---|---|
| 1-Cup | ~40–50 ml (~1.5 fl oz) | A small serving of concentrated coffee; very quick brew time. |
| 3-Cup | ~120–140 ml (~4–4.5 fl oz) | The sweet spot for one person. Ideal for a single morning latte, Americano, or iced coffee. |
| 6-Cup | ~240–270 ml (~8–9 fl oz) | Ideal for two people, or one person making a large, double-strength milk drink. |
| 9+ Cup | ~360+ ml (~12+ fl oz) | Usually unnecessary for a compact single-person setup; requires a large burner. |
For most small home cafés, a 3-cup model offers a practical balance between single-serving volume, compact storage, and quick heating times.

Aluminum vs. Stainless Steel: Choosing the Right Pot
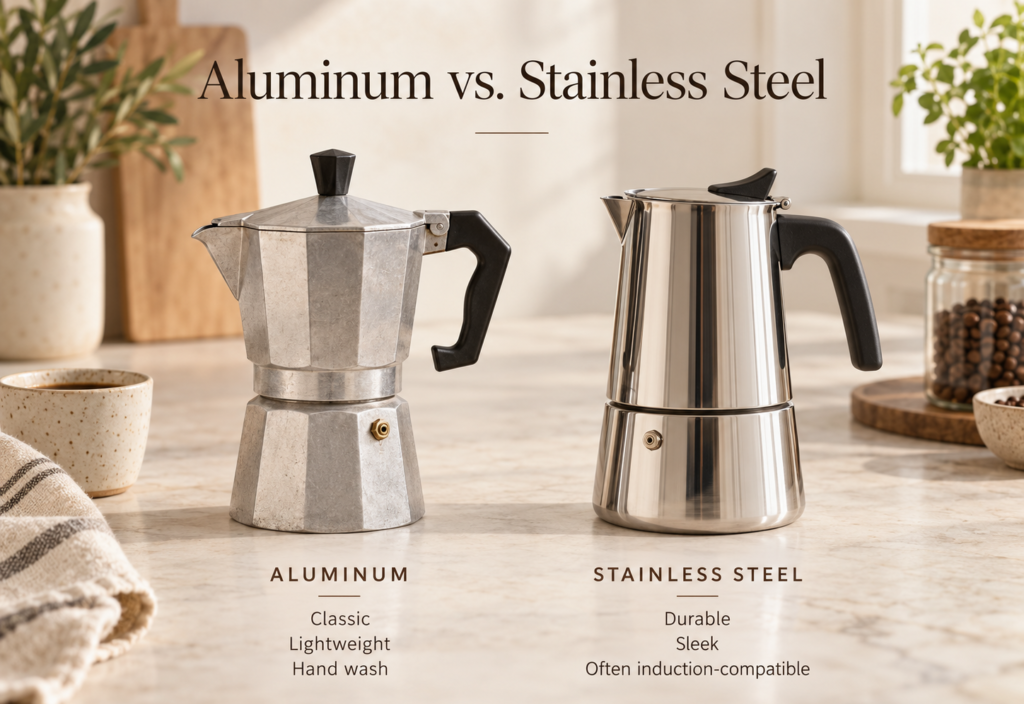
Moka pots come in two primary materials, each suited to different kitchen environments:
Aluminum (e.g., Bialetti Moka Express)
- Pros: Classic design, lightweight, excellent heat conductivity, lower cost.
- Cons: Intended for hand washing; incompatible with induction hobs without an adapter plate.
- Best For: Gas stoves, electric coil stoves, and traditional glass cooktops—ideal for iconic models like the Bialetti Moka Express.
Stainless Steel (e.g., Bialetti Venus)
- Pros: Sleek modern aesthetic, durable, rust-resistant, often induction-compatible.
- Cons: Slightly heavier; takes slightly longer to heat up on standard burners.
- Best For: Modern apartments with induction cooktops (though check your stove’s minimum detection diameter), or anyone who prefers stainless steel durability.
The Minimal Small-Space Moka Setup
You don’t need a counter full of specialized tools to make great coffee. Organizing your gear into practical categories keeps your kitchen clutter-free:
1. What You Actually Need
- Moka Pot (preferably a 3-cup model).
- Coffee (pre-ground for Moka/espresso, or whole beans).
- Stove or Hot Plate.
- Water & Mug.
2. Useful Compact Upgrades for Small Spaces
- Compact Hand Grinder: Freshly grinding coffee immediately before brewing can noticeably improve aroma and flavor. A manual hand grinder fits easily into a drawer, requires no power cord, and produces minimal noise.
- Small Digital Kitchen Scale: Measuring water and coffee grounds helps keep your ratio consistent from day to day.
- Small French Press or Hand Frother: A simple plunger French press or a small battery-operated frother lets you texture warm milk into creamy foam for lattes without needing a steam wand.
- Induction Adapter Plate (necessary only if using an aluminum Moka pot on an induction stove).

3. Optional Enthusiast Tweaks
- Paper-Filter Modifications: Do not add an AeroPress or other paper filter to a moka pot unless the maker of your exact model explicitly approves that configuration. Otherwise, use the pot’s specified filter parts and normal assembly.
- Dosing Funnel / Distribution Tool: Helps keep stray coffee grounds off small countertops when filling the filter basket, though careful spooning works fine too.
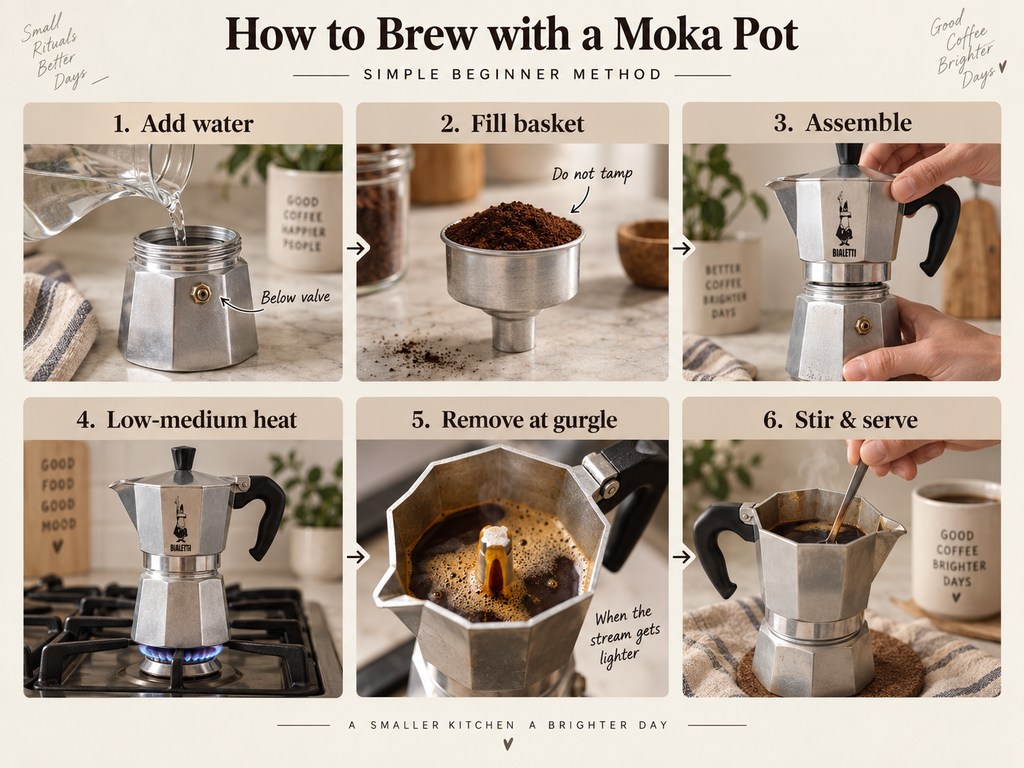
How to Make Coffee in a Moka Pot: Simple Beginner Method
Here is a straightforward, step-by-step guide on how to make coffee in a moka pot without overcomplicating your morning routine:
- Add Water: Pour fresh water into the lower chamber until the water level sits just below the safety valve. Never submerge the valve.
- Fill the Basket: Fill the filter basket full to the rim with medium-fine ground coffee (similar in texture to table salt or fine sand). Gently tap the side of the basket to settle the grounds level with the rim. Do not tamp or press the coffee down.
- Assemble the Pot: Insert the basket into the lower chamber. Wipe any loose grounds off the rim, then screw the top chamber on firmly to ensure a tight steam seal.
- Heat on Low-Medium: Place the assembled pot on a small burner over low-to-medium heat. Keep the lid closed during brewing on a Bialetti Moka Express, as its manual directs. For another moka pot, follow that model’s lid instructions rather than a generic open-lid technique.
- Listen & Remove: Stay nearby and keep the lid closed while brewing. For a Bialetti Moka Express, remove the pot from the heat when the upper chamber is full, as its manual directs. The first audible gurgling may also indicate that brewing is ending; if you hear it, remove the pot promptly rather than waiting for repeated gurgling or sputtering. Follow your own model’s stopping instructions if they differ.
- Stir & Serve: Give the coffee in the upper chamber a quick stir with a teaspoon to mix the early and late extraction layers together, then pour into your mug.
How to Make Better Moka Coffee (Advanced Tweaks)
Once you’ve mastered the basic method, these optional techniques can help eliminate bitterness and increase flavor clarity:
- Skip the Hot-Water Shortcut Unless Your Manual Supports It: Bialetti’s Moka Express instructions specify cold water and assembly before heating. Hot water can make the lower chamber difficult to handle safely while tightening the pot. For a Moka Express, use cold water; for a different model, follow its manufacturer’s method rather than gripping a hot boiler with a towel.
- Keep the Heat Controlled: Use the heat setting recommended for your moka pot and keep the lid closed if your model requires it. Do not open a Bialetti Moka Express lid to watch the stream. If the pot sputters violently, turn off the heat and, if safe, move it off the burner by the handle. Do not tighten, open, or unscrew it while hot; let it cool completely before checking the gasket, filter, grind, or assembly.
- End the Brew Safely: Once your model’s brewing-complete cue occurs, turn off the heat and, if safe, move the pot by its handle onto a heat-safe surface. This guide does not recommend running a hot moka pot under cold tap water without model-specific manufacturer guidance.
Three Café Drinks You Can Make Without an Espresso Machine

A strong Moka pot brew serves as an ideal base for classic home café beverages:
1. Moka Pot Latte
- Base: 1 part Moka coffee (approx. 2 oz / 60 ml).
- Milk: 2 parts warm milk (approx. 4–5 oz / 120–150 ml).
- Method: Heat milk in a saucepan or microwave until warm (~140°F / 60°C). Pour into a small French press and pump the plunger up and down for 10–15 seconds to create creamy milk foam. Pour over your Moka coffee.
2. Moka-Style Americano
- Base: 1 part Moka coffee (approx. 3 oz / 90 ml).
- Water: 2 parts hot water (approx. 4–6 oz / 120–180 ml).
- Method: Combine your Moka coffee with hot water from a kettle for a smooth, full-bodied mug of black coffee.
3. Iced Shaken Moka Coffee
- Base: 1 serving freshly brewed Moka coffee (approx. 3 oz / 90 ml).
- Additions: Ice cubes, 1 tsp sweetener or syrup (optional), splash of milk or cream.
- Method: Stir the hot moka coffee and sweetener in an open, heat-safe cup. Let it cool, add ice, and stir until chilled. Transfer only the chilled mixture to a shaker intended for cold drinks, then shake briefly. Never seal or shake hot liquid. Strain into a glass over fresh ice and top with milk.
Cleaning and Storing a Moka Pot in a Small Kitchen
Proper care keeps your coffee tasting fresh and extends the lifespan of your brewer:
- Daily Cleaning: Allow the pot to cool completely. Unscrew the chambers, discard the spent coffee grounds, and rinse all parts under warm water. Wipe with a soft sponge if needed.
- Dishwasher & Soap Guidance: Check your manufacturer’s care instructions. Traditional aluminum Moka pots are generally intended for hand washing using warm water; dishwashers and harsh detergents cause aluminum to oxidize. Stainless steel pots are generally more resilient, though hand washing remains gentle on silicone or rubber seals.
- Drying & Loose Storage: Always allow all components to dry thoroughly before assembling. Store the pot loosely assembled—without screwing the top chamber down tight—so the rubber gasket isn’t kept under constant compression.
- The One-Drawer Home Café: Because none of these tools require permanent counter power, you can nest your Moka pot, hand grinder, digital scale, and milk frother together in a single dedicated kitchen drawer.
Common Moka Pot Problems & Troubleshooting
| Symptom | Probable Cause | Quick Fix |
|---|---|---|
| Coffee tastes overly bitter or burnt | Heat was too high, grind was too fine, or the pot sat on the burner during the sputtering phase. | Lower the heat, coarsen the grind slightly, and remove the pot as soon as gurgling begins. |
| Coffee sputters violently right from the start | Heat is too high, or the pot isn’t screwed together tightly enough. | If the pot sputters violently from the start, turn off the heat and, if safe, move it off the burner by the handle. Do not try to tighten or unscrew a hot, sputtering pot. Let it cool completely before checking the gasket, filter, grind, and assembly against the manufacturer’s instructions. If the problem recurs, stop using the pot and contact the manufacturer. |
| No coffee comes out into the upper chamber | Coffee was tamped down, grind is as fine as flour, or the filter plate is blocked. | Do not tamp coffee. Use a medium-fine grind and check that the filter screen is clean. Note: If pressure appears to be building but coffee isn’t flowing, remove the pot from the heat immediately rather than continuing to heat it. |
| Coffee tastes weak or watery | Filter basket wasn’t filled completely, or grind size was too coarse. | Fill the basket flush to the rim and ensure your grind texture resembles table salt. |
Frequently Asked Questions (FAQ)
Is moka pot coffee the same as espresso?
No. Espresso machines force hot water through finely ground coffee at roughly 9 bars of pressure, producing a concentrated shot with crema. A Moka pot uses steam pressure (about 1.5–2 bars), resulting in a strong, concentrated coffee that is slightly less dense than espresso but much stronger than regular drip coffee.
Can you make espresso in a moka pot?
A moka pot produces strong, concentrated coffee rather than true 9-bar espresso. It can be a relatively low-cost option for milk-based drinks and can be stored after cooling, cleaning and drying, but it still needs a suitable cooking surface and safe handling space. Choose it for the drink and routine you want, not as an identical substitute for an espresso machine.
What size moka pot should one person buy?
A 3-cup Moka pot is ideal for one person. It yields about 4 to 4.5 fluid ounces of strong coffee—a convenient amount for a single morning latte, Americano, or iced coffee.
Can you use a Bialetti moka pot on an induction stove?
Many stainless steel models (like the Bialetti Venus) are induction-compatible. For classic aluminum models, place an induction adapter plate on the burner before setting down your Bialetti Moka pot.
What grind size should I use for a moka pot?
Use a medium-fine grind—slightly coarser than powdery espresso, but finer than drip coffee. It should feel slightly gritty between your fingers, similar to table salt or fine sand.
Why does my moka pot coffee taste bitter?
Bitterness usually comes from excessive heat, using a grind that is too fine, tamping the grounds, or leaving the pot on the burner during the final sputtering phase.
Is a Moka Pot Right for Your Home Café?
If you want a rich, milk-ready coffee base without dedicating valuable counter space to a large appliance, learning how to use a moka pot is one of the most practical coffee skills you can learn. By choosing the right pot size, using a medium-fine grind, and controlling stove heat, you can enjoy café-style lattes and Americanos from a setup that completely disappears into a drawer when you’re done.